Tips and best practices for effective Salesforce lead management

Related topics:
Last updated:
Editor's note: We rely on our experience in CRM services, accumulated since 2008, to describe the full functionality of a robust CRM system for effective lead management.
Companies that strive to improve their sales pipeline and close more deals with Salesforce eventually realize that they need to go beyond regular monitoring of sales effectiveness and creating numerous pipeline dashboards. Rather, this process starts with building a seamless workflow that describes how sales reps should work with leads to convert them into closed sales deals. We leverage our Salesforce consulting experience, to show how companies can effectively manage leads as well as convert them into opportunities thereby increasing sales and bridging the gap between sales and marketing teams using Salesforce lead management.
Introducing Salesforce lead management functionality
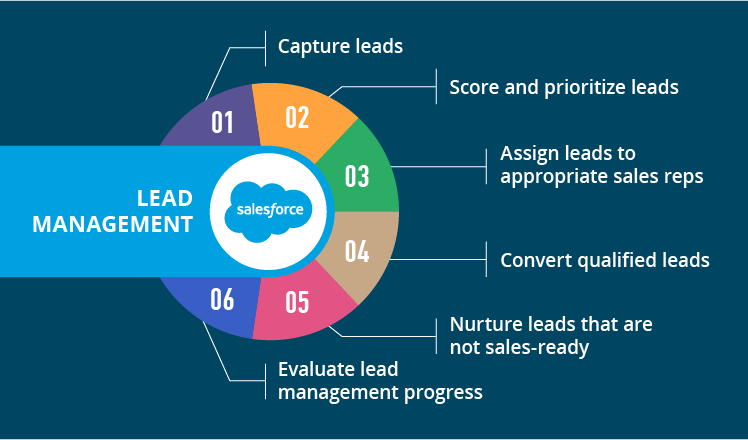
Using Salesforce, companies can track all stages of the lead management process, including:
- Capturing leads;
- Scoring leads to identify which ones are sales-ready;
- Prioritizing leads and assigning them to appropriate sales reps;
- Converting qualified leads into a sales opportunity;
- Nurturing leads that are not ready to buy yet;
- Evaluating lead management progress.
Note: The rule of thumb for a sales rep is to enter any new name as a Lead in Salesforce. However, some companies ignore this rule and prefer using Contacts tab instead. Though this format is acceptable for small companies or in case you get a new name from an existing account, we advise bigger companies with a sizable number of leads to follow the recommended approach.
A standard Salesforce lead record consists of fields that store information about each person that expressed interest to do business with your company. This record can include up to 25 different fields, but the most important of them are:
- Lead Owner;
- Lead Status;
- Lead Source.
1. Lead Owner is a particular person that works with a lead. A sales rep can either assign a lead owner for each lead or place a number of leads in a queue and let a sales team decide on the lead ownership.
2. Lead Status indicates lead tracking stages that allow sales reps to track sales process and prioritize future activities.
By default, Salesforce offers the following lead tracking stages:
- New;
- Working;
- Nurturing;
- Unqualified;
- Qualified.
In case you have a more complex lead tracking process, Salesforce allows you to customize this standard list.
3. Lead Source shows where your leads come from. Though this field is optional, we advise companies to make it mandatory for sales reps to fill in the Lead Source.
By default, Salesforce offers the following lead source list:
- Advertisement;
- Customer event;
- Employee referral;
- Purchased list;
- Trade show;
- Webinar;
- Website;
- Other.
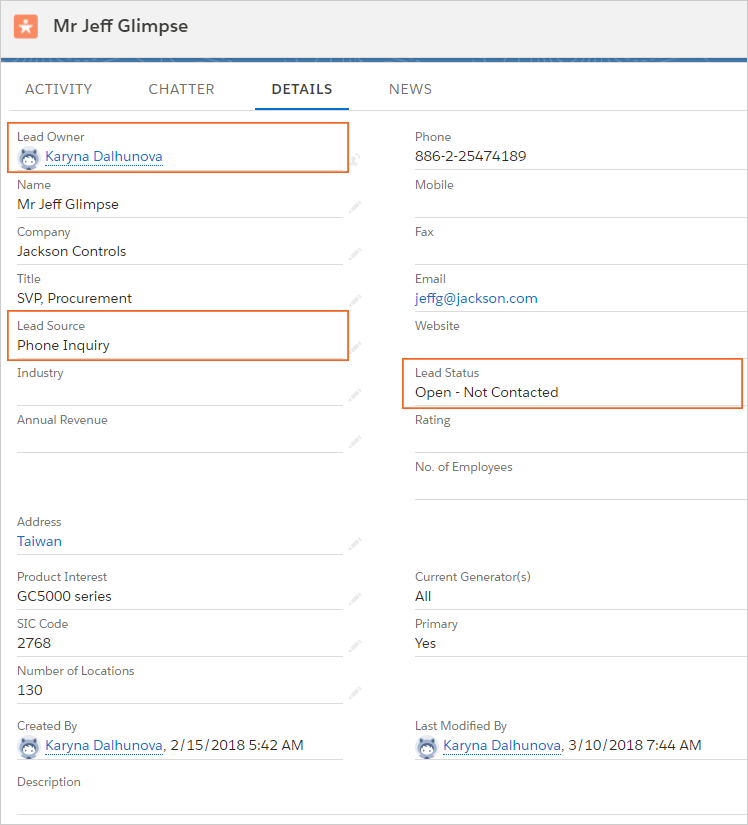
Standard Salesforce lead record
You can also add custom fields to this list. Once available, this information helps calculate the ROI of your lead-generating activities and find out if your marketing channels work successfully. With this knowledge, you can make informed decisions on where to spend your marketing and sales efforts.
As you can see, the ultimate goal of a sales rep in the lead management process is to make a new lead ‘qualified’ and finally convert it. When it happens, the lead becomes a contact (person), account (company), and an opportunity (potential sale) in the Salesforce system. However, sometimes a lead can become a contact and an account without becoming an opportunity. As a rule, this happens when you currently don’t anticipate any revenue stream related to this particular lead.
Now, as you know what you should track in your Salesforce lead records, it’s time to organize your lead management process so that it brings maximum benefit to your company. Below, our Salesforce consultants have prepared a step-by-step guide to help you succeed.
7 steps towards effective Salesforce lead management process
1. Capture more leads
The more leads you have, the more opportunities and successfully closed deals you may have. With Salesforce, you have various options to increase your lead database:
- Automatic lead capturing using either Salesforce in-built functionality or Salesforce AppExchange apps. In particular, you can enable Salesforce web-to-lead feature that automatically captures visitor information from the website or install Toucan, a Twitter client for Salesforce that can help you promote products through Twitter campaigns and gather information about people who follow you.
- Lead import using the Salesforce Data Import Wizard. With this tool, you can ensure mass import of your leads from Excel spreadsheets or email apps, such as Outlook or Gmail.
- Manual lead input works well for individual leads.
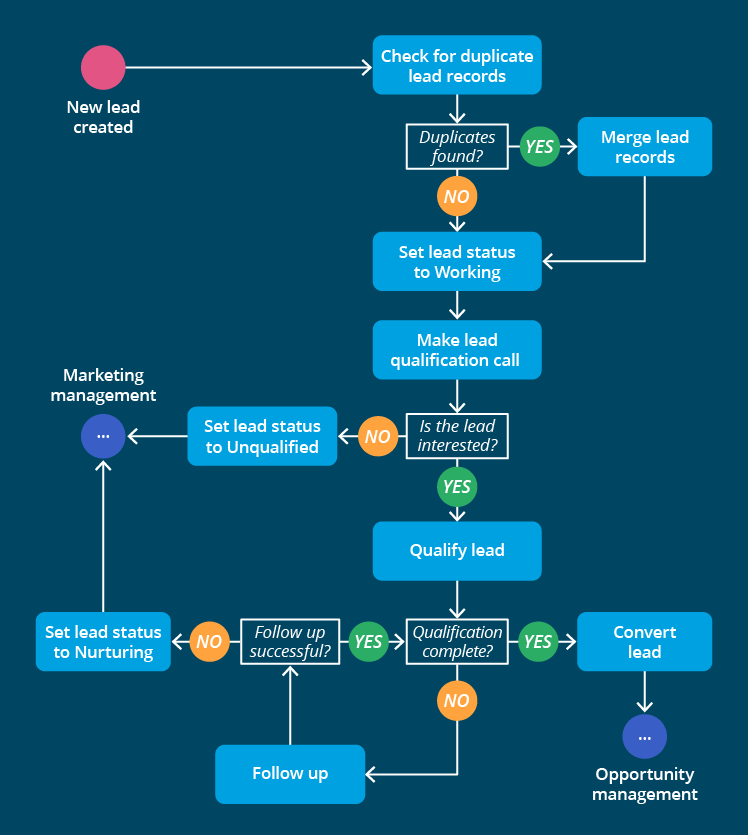
2. Check whether you have duplicate lead records
The earlier you begin your lead record cleansing, the less is the probability that your contact list will become a mess. Duplicate leads in Salesforce can appear due to various reasons:
- The same lead may have responded to several marketing campaigns.
- The same person may have had various activities on your website (e.g., downloaded a presentation and sent a request for proposal).
- Someone a sales rep met at a conference may have also responded to an email.
- You have purchased a 3rd party list of leads that contained contacts you already have, etc.
So, before you create a new lead, make sure you won’t create a duplicate. In case you find several profiles belonging to the same person, you can merge them with either Salesforce or partner data cleansing tools found in the AppExchange. Besides, you can use validation rules that limit the conversion of leads with incomplete data.
3. Follow lead qualification requirements
When you get a new lead, you'll likely want to figure out whether this person is just kicking the tires or can really bring revenue for you. That is why before converting a lead into an opportunity, it should pass a set of lead qualifications criteria. Thus, once you decided to manage leads in Salesforce, you should determine the lead conversion point so that you could build an adequate sales pipeline later on.
In our practice we’ve seen the following conversion options:
- Convert leads once they have shown a semblance of interest in your company.
- Convert leads after you have agreed on a sales meeting date and the prospect attended it.
- Convert leads once they have passed the lead score threshold, which depends on the degree of profile completeness.
- Convert leads only after a sales rep specified the price.
N.B.: Early lead-opportunity conversions may result in a larger opportunity pipeline but lower win rates. And vice versa, those companies that opt for later conversions and smaller pipelines usually have higher win rates. Thus, it’s you who should decide on the amount and quality of opportunities you’d like to keep in your pipeline.
From our experience, we advise to convert a lead into an opportunity only when a sales rep can specify most of the following areas:
- Business challenge
- Close date
- Deal size (amount of revenue)
- Competitors
- Name of the final decision maker.
4. Consider how to prioritize leads and distribute them among sales reps
In case your sales team handle leads on a first‐come-first‐served basis, you may benefit from lead queues that store pools of leads grouped by territory, business function and other attributes. For example, you may have separate lead queues for a California-based team and a Texas-based team, so when you add sales reps as queue members they will be able to pick leads only from the queue they have access to.
If your company generates lots of leads, or you just want to automate the lead distribution process, you can use assignment rules to route leads to the right sales reps or queues. With this feature, the administrator can specify who should receive a lead and under what conditions. For example, to automate lead distribution in the above example, you can use ZIP codes to assign leads to appropriate teams.
5. Keep your leads moving towards the conversion point
The ultimate goal for any sales rep is to convert a lead into an opportunity or disqualify it in case they are currently not interested in your offer. That is why a good practice in Salesforce lead management is to assign a follow-up task so that leads don’t stay leads for a long time. When done properly, the queue will only contain the ‘freshest’ leads for the immediate follow-up. For this purpose, we advise following a straightforward rule: A lead should be converted within two weeks, otherwise it should be classified as ‘unqualified’ and removed from the list of current leads. However, it's possible to adjust this time period according to your individual sales tactic.
6. Nurture your leads
If a lead is currently not ready to purchase your products or services, sales reps should go for lead nurturing, which usually turns out to be a rather sophisticated task. Lead nurturing is much more comprehensive than just sending a monthly email or calling a lead every two weeks to check whether they’re finally ready to buy. A sales rep should build meaningful conversations by sending guides, tips, industry research, and other useful content that will not only help leads solve their daily pains but also position your company as a trustworthy partner. To enhance this process, you can use Salesforce Pardot’s drip campaigns that allow managing multiple nurturing tasks (e.g., dynamically choose content for each prospect based on various criteria).
7. Track your lead management effectiveness
To be aware if your lead management is effective, you should monitor which of your marketing campaigns bring benefit and which of them need to be improved. Salesforce offers various tools to track your lead management results.
- Lead history reports ensure traceability between various lead criteria, such as lead source, industry, or annual revenue and opportunity amounts.
- Dashboards to track results of your lead-generation efforts with different metrics, such as the number of leads, the number of converted leads and pipeline amount.
On the final note
Salesforce is a powerful tool that can help you increase the number of leads and effectively manage them. However, Salesforce on its own doesn’t guarantee brilliant lead management results. That is why a company that wants to see tangible benefits from Salesforce lead management should have a clear vision of how to treat leads first and only then automate this process with Salesforce.
